Showing posts with label motor. Show all posts

Tuesday, May 13, 2014

It's Hard to Keep a Wild Hawk Down

As much as I like my Wild Hawk, there are times when I try things that are too much for me.  This time it was flying in stormy weather on Superbowl Sunday.  I just had to go out before the start of the game and get some flying in.  The wind was quite strong and it was just drizzly.  I thought I would have lost it on the launch, but favor was with me and I was able to get in the air without incident.  Once up I found that I had enough throttle to over power the wind.  I used this to fly down wind and then slowly cruse back into the wind.  I drive a Jeep Cherokee, and with the Jeep nosed into the wind, I took advantage of the shelter under the lift gate.  I was able to hover my Wild Hawk just 30 feet out for quite some time through judicial use of the throttle and flight controls.  I had a lot of fun doing this.

Just as I was about to conclude my flying, I took one last flight down wind.  The wind had picked up and I was finding it quite difficult to turn around.  Then it happened.  I was way down wind, struggling, and lost my orientation.  The next thing I knew my Wild Hawk was heading quickly into the ground.  I then saw pieces fly up into the air.

I recovered all the pieces that I could find and headed home to review the damage and watch the game.  Needless to say, I will be performing another full rebuild of my Wild Hawk.  The following are photos of the damage and reconstruction.

From this photo you kind of get an idea of the amount of damage.  Fortunately the wing survived quite well!

This is back home on my table.  I took all of the pieces apart as well as completely removed anything that was hanging together.  I find it easier to re-glue whole pieces together rather than trying to work glue into cracks.
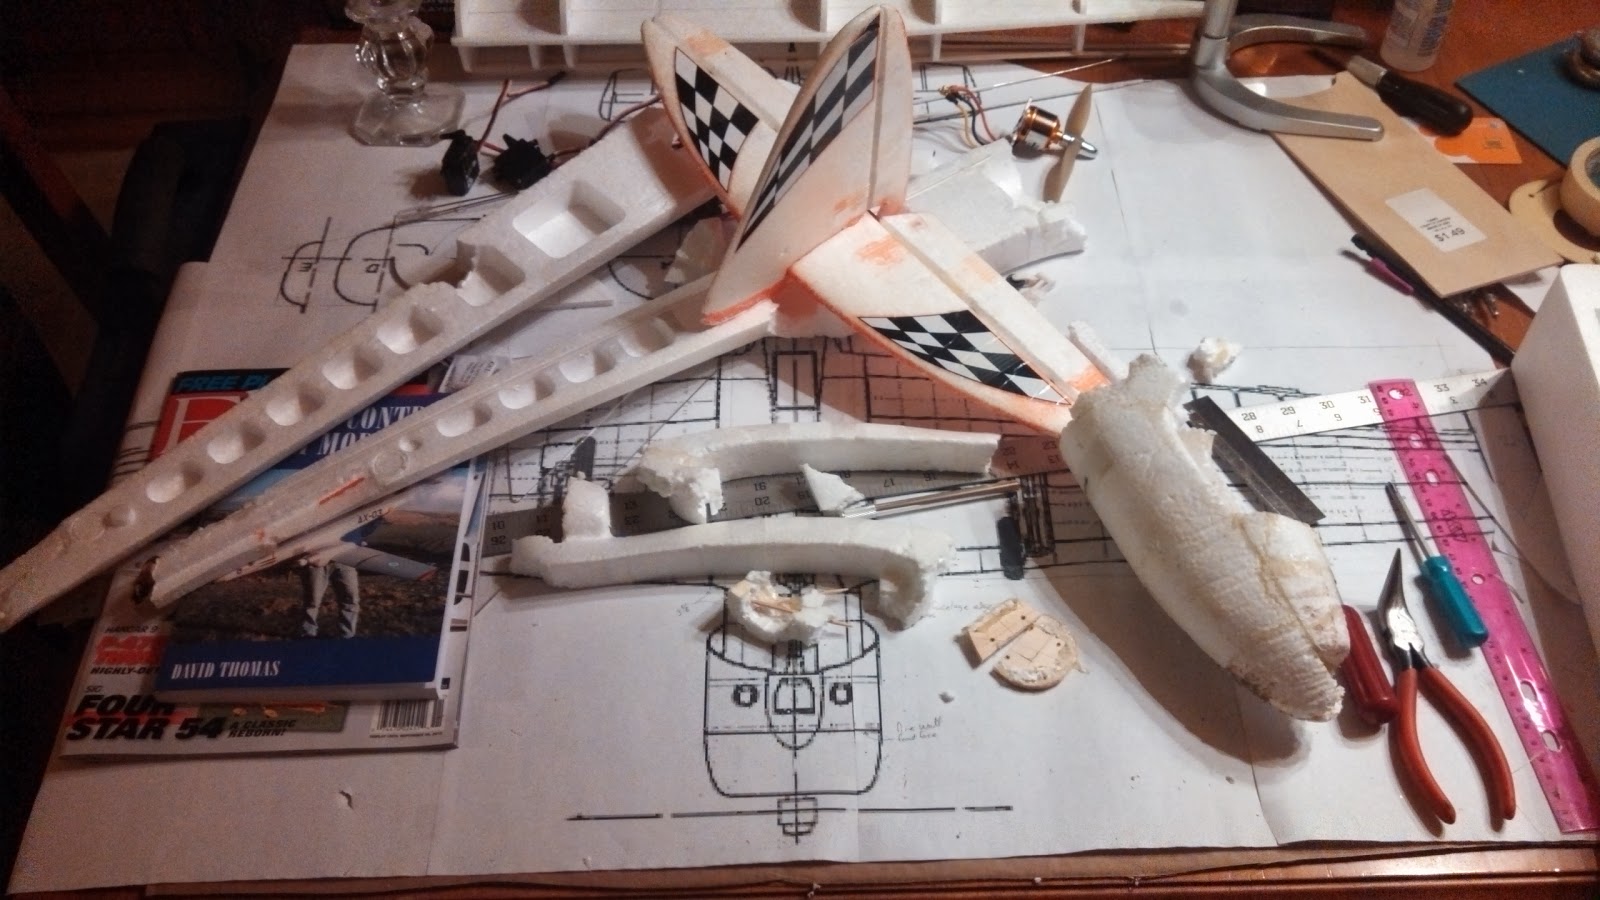


I took everything apart.


I do mean everything!

Again, I found it easier to reform pieces and fit them together by taking them completely apart.  I even pulled out hot glue seams that I did not like and re-glued them.

This time I did not use hot glue, but my new favorite foam glue, Gorilla Glue.  I really love this stuff!  I get a nice strong joint that is light weight.  Also, this glue has the added benefit of expanding to fill voids.


I worked on keeping the pieces as straight as possible, making them into bigger pieces and then putting these bigger pieces together.


Here it's really coming together but I did decide to completely redo the motor mount and give it a more correct thrust angle.  For a pusher, the thrust should be strait into the CG point.


More pieces of foam glued in place to fill in the gaps.


The final look of the motor mount.  Also the nose is back on and some of the electronics as well.

I did later discover that this was just a little too steep of a thrust angle and ended up putting a few millimeter washers under the top motor mounts.


This all took a lot of patience as it does take a lot longer for Gorilla Glue to cure that hot glue and it took some time to take all the pieces apart and remove the old hot glue.  But, it was all well worth it.

I don't know why I did not get any pictures of the completed plane, but it came together nicely and continues to be a fun plane to fly.

So, if you completely trash your Wild Hawk in a horrific crash, never fear.  With some time and patience you can have it in the air again and have it flying better than ever.

Thanks for stopping by my blog.  Please feel free to post comments, good or bad, and be sure to come back and check for future posts.

Thursday, November 1, 2012

What Mods to make to your Wild Hawk

Hello all,

Once you've played with your Wild Hawk and have become comfortable flying it, you can get the bug to take your Wild Hawk to the next level.  With this in mind, these are the mods I would recommend, and have made, to my Wild Hawk.

Here are the mods that I recommend and the order that I would make them.

First mod: Fix those tail hinges

I originally thought of putting this in with what I would do with a new plane out of the box, but decided it was too much of an upgrade to include there.  What I propose here is to cut the movable rudder and elevator surfaces off and replace the factory foam hinges with tape hinges.  This is a little more complex than it sounds on the surface.  Once the parts are cut away, they need to have the old hinge surfaces trimmed up.  The elevator surfaces should have the plastic connector piece removed and then they should be reconnected with a bamboo or other dowel.  I recommend increasing the gap between the two surfaces (the gap for the lower portion of the rudder) by about 1/8 of an inch.  This will help to ensure that the rudder will have the most motion possible and not hit the elevator.  Now you can follow my hinge post on how to do the actual tape hinges.

Second mod: Update that battery

I really feel that the next mod it to replace the NiMH battery with an upgraded LiPo battery.  The energy density of new LiPo batteries is just too much to pass up.  For about the same weight you can almost double your mAH rating and run time.  This is done by checking out your favorite hobby supplier and seeing what LiPo options are available.  I recommend 1300mAH to 2200mAH, 3 cell (series connected cells), LiPo packs.  Most likely these new battery packs will not come with the same connector and you will need to replace the connector on the battery pack to match the speed controller, or replace the connector on the speed controller to match the battery pack.  This is easy enough to do if you know how to solder.  If you don't, find a friend or hobby shop person that can do this for you.  This new pack will also supply more voltage to your motor.  Your new 3 cell LiPo pack will provide 11 to 12 volts as apposed to the 8 to 10 volts of the NiMH pack.  This will give you more RPMs out of your motor and more thrust.  I think you will find this especially helpful during take off.  Some people have warned me about the possibility of burning out the stock brushed motor.  While this is possible, I have not noticed any issues with this and have been pretty harsh on mine.
I did a pretty severe mod to make sure that my battery fit the way I wanted it to.  I actually cut off the top of the nose and used a soldering iron to melt the foam until the battery fit snug.  Then I hot glued the top of the nose back on.


Third mod: Cut in some ailerons

I feel that this is an interesting mod because it can be done before upgrading your transmitter and receiver to more channels.  As I found out, it's actually just as easy (if not easier) to fly with just elevator and ailerons as it is with elevator and rudder.  I detailed my aileron mod in this post.


Fourth mod: Upgrade your radio

The fourth mod that I would suggest is to upgrade your radio to a 6 channel radio.  I would go beyond a four channel radio (which would be enough for all the controls needed on this plane) only because I really feel that 6 channels is the minimum for a really useful radio setup.  This is probably the easiest mod that you can make to this plane.  The hardest part is deciding what radio you will upgrade to.  I purchased the least expensive 6 channel 2.4GHz radio that I could find because I wanted the benefits of 2.4GHz (small antenna and spread spectrum technology) and I'm a cheep Dutchman.  My cheep radio is not the easiest to use, but has not let me down.

So this mod is as simple as replacing the stock receiver with your new one.  You will need test and make sure that you get the servos plugged into the correct locations and make sure that you get the polarity right.


Fifth mod: Upgrade your speed controller and motor

This is probably the most gratifying mod, as when it's done right, it can really boost your plane performance and enable you to do some really fun things.  The things you can do?  How about belly take offs without landing gear and vertical flights to high altitude. The biggest thing to take note of here is that this plane is limited on the size of the propeller that can be installed.  I've only been able to upgrade to a maximum 6 inch propeller.  This means that you will need to turn this propeller faster to get the extra thrust needed to be able to do the things I mentioned above.  So, the Kv rating of a motor becomes an important factor to keep in mind.  The Kv rating refers to the RPMs per volt rating of the motor.  I recommend 2200Kv brushless motor.  This is a bit high, but a 1400Kv motor, while certainly enough power, will not give the really fun performance we're looking for.  We also do not want a motor that is too small and so we will want to look for a motor that is rated in the 250 to 400 watt range.  This will ensure that the motor will handle the current and voltage without overheating.  Once your motor is selected, then you need to find a speed controller that will handle the current rating of the motor.  Also look for a speed controller that will be easy to program or need no programming, and has an adequate BEC to power your receiver and servos.  Depending on the pieces that you put together you may need to modify your power connectors at the battery or motor.  I was able to purchase my battery, ESC, and brushless motor from the same company (Turnegy) and so they all fit together without any changes needed.  Unless an in-runner brushless motor of the same diameter is found, you will be using and out-runner that will need special mounting.  I cut the motor nacelle back and added a wooden fire wall.  This was placed such that the propeller would be located in the same place as the original.  This post will show exactly what I did to upgrade my ESC and motor.

Thanks for stopping by my blog.  Please feel free to post comments, good or bad, and be sure to come back and check for future posts.

Sunday, May 13, 2012

Blown Motor

Recently I got a little ambitious and decided I wanted to fly my Wild Hawk in the wind again.  We  had a few good days of wind and I got my opportunity on a recent Sunday.  My oldest daughter is home from college and she graciously offered to spend some time with her dad and be my film crew.

We headed out to the nearby park that I like to fly at and setup for a windy day of flying.  We were all set to go and then this happened (see the video below)


Not but a few seconds in the air and the motor suddenly quit!  My big head gets in the way so you can't see the crash landing.  Fortunately it is spring and the local growth in the wild life area is about three feet high so, no damage at all.

After retrieving my Wild Hawk, I tested things out and the following video shows what I found.


You can see that the motor would do little more than stutter around and mostly not turn.  I was so disappointed because this meant that most likely I was buying a new motor.

Time to take this plane back home and check everything out.

Testing the ESC
I  suspected that the motor was at fault but the first thing that I did was to check the speed controller with another motor, just to make sure.  This picture shows another motor connected as well as my servo tester.  This test showed the speed controller to be working just fine.

Now I have to dig into the motor itself to see what is going on.  I started by taking it apart.  This was easy and just required the removal of a snap ring and the can with the magnets just slipped right off (OK, I had to tug pretty hard to get past the magnetic pull).  I then gave it a good inspection looking for obvious problems like broken or shorted wires.

Problem found
Since I did not find anything obvious, I then used a multi-meter to test the windings.  I had continuity between the black and yellow wires but not between the red and any other wire.  This meant that there was and issue with this part of the wiring.  After some closer inspection (this included the high tech method of tugging on the wires and connections), I found that the bullet connector had a cold solder joint and actually pulled right off (yeah, tug test found this one).
The repair

This merely required the correct application of heat and solder to fix.  I also found it helpful to make sure all of the heat shrink was where it was supposed to be before I got too far.  Next time I'll be more careful with this.

Any way, this fixed my problem and within 30 minutes my daughter and I were back out at the park and flying in the wind.  See my next post for that experience.

As usual, thanks for stopping by my blog and please post comments, good or bad.  Be sure to come back and check for future posts.

Sunday, January 15, 2012

Motor Mods

Hello all, I discovered that my new Wild Hawk motor is not performing as well as I expected.  I wondered why and after some research I found that others who had made similar modifications also upped the prop size from the stock 5x5 to 6x4 to 6x5.  So, that is my next update.

Ok, ok, I know that the Turnigy 2628/10 1400Kvm motor is a bit under speed for this modification, but for now, its what I've got.

Needs 2 or 3 more mm
Others were successfully using these props on their Wild Hawks so I did not think it would be a big deal and picked up a few of the size I mentioned above.  I tried to install one of these 6" diameter props but, it hit the tail boom on my plane, so I needed an explanation of what I had done wrong and a solution.

After some correspondence with Fishbonez and NJSwede, they said it should have fit, but if it's only a few mm, I could just cut out the foam.  So back to take a look at things.

After looking at my situation, I decided that I should be able to move the screw holes for my motor up enough to create the needed clearance.  After unbolting the motor, this is the view I had showing the alignment marks I used to locate the original mounting holes.


New holes marked and drilled
Ready to mark the new holes
 I added these lines to help layout the new holes directly above those that are already there.  It looked like I should be able to safely move the holes straight up about 6mm.  I marked them out and pilot drilled them with a 1/16" drill bit.


It fits!
Just enough clearance
  Fitting on the motor shows that the clearance is just right.  This is probably closer to the shaft location of the original motor than my original modified location.  This would explain why this prop did not work before but does now.

Original motor location, face view
New location. You can see the old holes
 I like this solution because it was a lot easier than another option I was considering (building a new firewall to add on on top of this one) and I did not have to remove any foam for clearance.  Removing foam for clearance might have actually been the easiest solution, but I've had bad experiences with doing this before on another plane and so I really did not want to do this again.

Now I'm ready to test out those larger props and see if I get any more performance over the old 5x5 prop without burning up the motor or speed controller.  I'll post again with the results.

UPDATE:

The 7" has much broader blades
I really like these APC electric props
I have since flown this configuration and found that this APC 6x5 prop, while much better than stock, was not performing as I had hoped.  I have since taken a 7x5 and cut it down to 6" in diameter and carefully trimmed and re-balanced.  As these APV props have a much broader blase mid section they grab much more air than others.  Most other props have the same blade width for a series of props and the only thing that changes is the length.

I now have all the power that I need and am seeing the performance of this torqueie 1400KV outrunner.  I have also tried this with an 8x4 and with similar results.  See my Wild Hawk vs Wind post for how well this configuration did.

Thanks for stopping by my blog and please post comments, good or bad.  Be sure to come back and check for future posts.