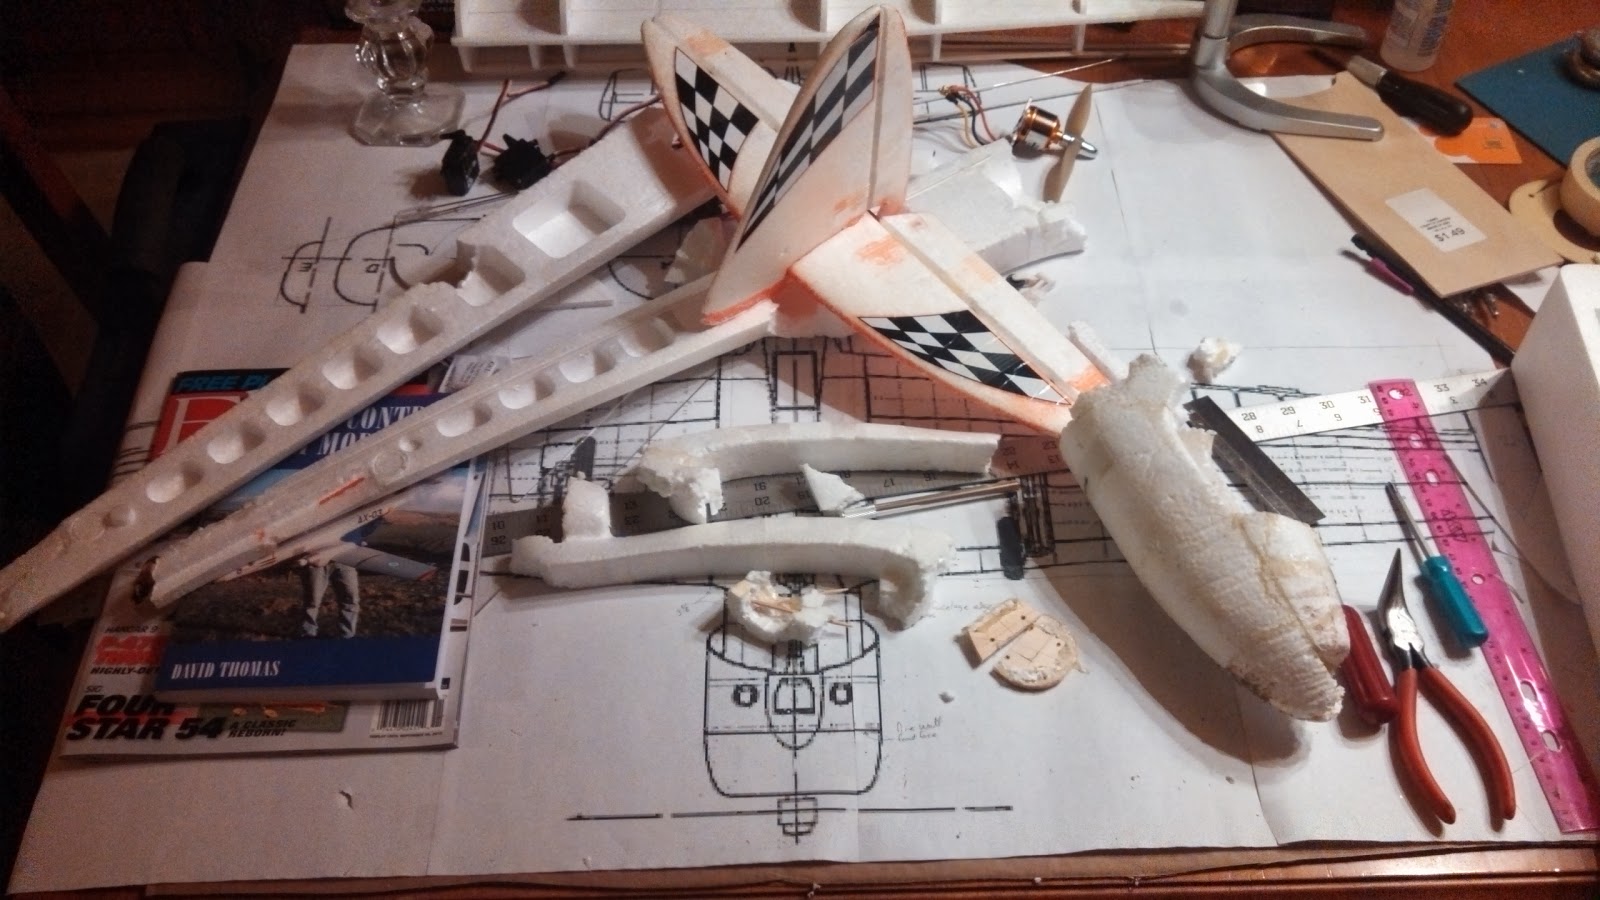
As much as I like my Wild Hawk, there are times when I try things that are too much for me. This time it was flying in stormy weather on Superbowl Sunday. I just had to go out before the start of the game and get some flying in. The wind was quite strong and it was just drizzly. I thought I would have lost it on the launch, but favor was with me and I was able to get in the air without incident. Once up I found that I had enough throttle to over power the wind. I used this to fly down wind and then slowly cruse back into the wind. I drive a Jeep Cherokee, and with the Jeep nosed into the wind, I took advantage of the shelter under the lift gate. I was able to hover my Wild Hawk just 30 feet out for quite some time through judicial use of the throttle and flight controls. I had a lot of fun doing this.
Just as I was about to conclude my flying, I took one last flight down wind. The wind had picked up and I was finding it quite difficult to turn around. Then it happened. I was way down wind, struggling, and lost my orientation. The next thing I knew my Wild Hawk was heading quickly into the ground. I then saw pieces fly up into the air.
I recovered all the pieces that I could find and headed home to review the damage and watch the game. Needless to say, I will be performing another full rebuild of my Wild Hawk. The following are photos of the damage and reconstruction.
From this photo you kind of get an idea of the amount of damage. Fortunately the wing survived quite well!
This is back home on my table. I took all of the pieces apart as well as completely removed anything that was hanging together. I find it easier to re-glue whole pieces together rather than trying to work glue into cracks.
I took everything apart.
I do mean everything!
Again, I found it easier to reform pieces and fit them together by taking them completely apart. I even pulled out hot glue seams that I did not like and re-glued them.
This time I did not use hot glue, but my new favorite foam glue, Gorilla Glue. I really love this stuff! I get a nice strong joint that is light weight. Also, this glue has the added benefit of expanding to fill voids.
I worked on keeping the pieces as straight as possible, making them into bigger pieces and then putting these bigger pieces together.
Here it's really coming together but I did decide to completely redo the motor mount and give it a more correct thrust angle. For a pusher, the thrust should be strait into the CG point.
More pieces of foam glued in place to fill in the gaps.
The final look of the motor mount. Also the nose is back on and some of the electronics as well.
I did later discover that this was just a little too steep of a thrust angle and ended up putting a few millimeter washers under the top motor mounts.
This all took a lot of patience as it does take a lot longer for Gorilla Glue to cure that hot glue and it took some time to take all the pieces apart and remove the old hot glue. But, it was all well worth it.
I don't know why I did not get any pictures of the completed plane, but it came together nicely and continues to be a fun plane to fly.
So, if you completely trash your Wild Hawk in a horrific crash, never fear. With some time and patience you can have it in the air again and have it flying better than ever.
Thanks for stopping by my blog. Please feel free to post comments, good or bad, and be sure to come back and check for future posts.
There are people who have expressed an interest in how to best setup their Wild Hawk out of the box and there are those who complain that their Wild Hawk is a piece of crap and does not fly. The information that both people need is the same. There are several configuration updates of a stock Wild Hawk that are important to make it the good flying plane that people love.
This is what I would do to setup a brand new, out of the box, Wild Hawk:
Glue tail surfaces
While the double face tape used to secure the tail surfaces on the Wild Hawk is adequate and will hold the parts together for quite some time, it will come loose. My recommendation is to just glue it up from the start and don't risk them coming loose in flight (yes, I have experienced this).
This shows the elevator flush with the end of the tail spar.
The first thing that needs to be done is to remove the double face tape. If you skip this part, you risk your parts coming apart as your gluing will only be as strong as the tape. Taking the tape off is not easy, but can be done with just your fingers. Using tweezers would probably make this task much easier. Now that all of the tape has been removed, its time to glue things up. It's important to glue the elevator in first and them add on the rudder. Take your time with this step and make sure the parts line up. The elevator should line up at the tail end and not the front edge like it might seem. If you don't line it up this way, you will risk the movable surfaces hitting they tail spar and not moving properly.
Re-position the battery
I don't know if it can be clearly seen in this photo, but the battery
us upside down. It will be rotated counter clock wise and slid
forward as far as possible.
This modification require the removal of the foam ridge at the forward most edge of the battery. This piece of foam it not that easy to remove but it can be done without too much trouble. Once this is removed, the battery can be placed back in upside down and with the power wires still in the side cut out for them. Since the Wild Hawk is notoriously tail heavy and does not have a proper center of gravity (CG), this is the minimum that must be done to make this plane flyable. This does not resolve this plane's CG issues, but give you a good head start.
Don't install the landing gear
While you're learning, you will not need the landing gear. Don't even bother installing them, they will just get in the way. Just make sure that you are flying near a nice grassy area and learn to belly land your Wild Hawk there.
Tape up fuselage
This is an important step to help make sure that your Wild Hawk is as rugged as possible. I have a whole post dedicated to this and it can be seen here: How to tape a Wild Hawk
Tape up wings
This is another important step as well in making sure that your Wild Hawk is as rugged as possible. This step is also covered toward the end of the above blog post link.
Balance for CG
This is an important step in making sure that your Wild Hawk is as flyable as possible I like my Wild Hawk leaning toward the nose heavy side and so I have my plane setup to balance at about 2 1/4 inches from the leading edge of the wing. This is my CG and is just forward of the embedded wing spar. A lot of people have theirs set for a CG of 2 1/2 to 3 inches from the leading edge. This will require the addition of weight to the front of the plane. I started by literally taping washers to the nose of my plane. This worked fine and has worked fine for others that I know. I decided to do something that I felt would be better and more permanent for mine. What I did was to tape fishing split shot to my plane nose until the CG was right again. Then I used my solder iron to melt some holes into the nose to hold the split shot. When this was all in place, I used hot glue to secure it all. I have a post here that shows how I did this: Weighted Question. This post shows how I made a CG finder: CG Finder
Now your Wild Hawk should be very flyable and ruggedised. If after all of this you are having issues flying this plane, the problems are not with the plane.
As usual, thanks for stopping by my blog and please post comments, good or bad. Be sure to come back and check for future posts.
If you saw my last post you know that I completely revamped the Wild Hawk's power system; new motor, new speed controller, and new LiPO battery. It was hard waiting and I finally had a chance to get out and fly it. I have to mention here that I also had a plan to take video from the plane using an old cell phone (still waiting for the shipment of the cheap mini DVRs to come in at Hobby King). So, I went out to kill two birds with one stone.
The first item on my list was to just fly the plane and make sure all was well and to see what the performance was. After making sure the speed controller emitted the appropriate beeps, I was set to go. I powered up to full throttle and hand launched the plane into the air. It flew very nice, but was not the rocket that I expected. I had seen others mod their planes similarly and they seemed to go vertical until out of site. Although I could tell I had more power, it would not "go vertical." At first I was a little disappointed as i had done a lot of motor research to match a similar motor as, the Dutchman that I am, I was not going to pay the $40 for the motor recommended (I got mine for less than $20).
Any way, the newly powered Wild Hawk flew very nice. I did notice that I could throttle way back and still not loose altitude.
So, that done, it was time to strap on the camera (and I do mean strap on). I pulled out the cell phone camera and got it ready. This was actually quite the ordeal as the phone is an early touch screen model LG and the touch part has been failing. I found out from Google searching my issue that if I pealed off the top clear layer of the screen I could regain some of the functionality. I did find out through trial and error that I also had to hold down the, now visible, connector area to regain functionality of the whole screen. Also, going back a bit further in this part of the story, since this phone is no longer used and I do not have a valid SIM card for it, I had to set it up in, fittingly enough, "airplane mode". This disabled the cell portion of the phone while still allowing for use of the rest of the phones functions. I was not able to accomplish this until I resolved the touch screen issue. OK, the last thing I did was to make sure that the phones video camera feature recorded to the internal micro SD card. This last item would make it much easier to access the videos taken (I never had the special USB cord for the phone and I didn't want to deal with Bluetooth).
OK, now I was ready to strap on the cell phone camera and take some video. The plane was still on from the last flight and ready to go. I took out the roll of strapping tape (see, I really mean "strapped on") and cut off a long strip, about a foot. I carefully placed this across the camera side of the phone leaving the rest evenly hung over either end. Then I started the video camera and placed the phone on the underside of the wing and pulled the tape around the front and tail of the wing. I made a last minute check of the controls, hit the throttle and launched it into the air.
It flew great! The added weight of the phone (not insignificant) made not difference other than a slight trim of the ailerons. I let it fly in circles slowly gaining altitude. The day was a bit cloudy and pretty soon the Wild Hawk was fading in and out as it passed through some of them. "Awsome" was my thought as I thought of what video I might be getting. I continued to fly around and took the plane over some nearby homes and then back again. As far as the power goes, I was able to cut back to 1/4 - 1/3 throttle and maintain altitude with ease. This is certainly an improvement over the old power train especially with the added payload. I flew for at least 5 minutes and struggled to bring it down to make a few practice landing passes. This plane really wanted to stay up in the air.
A few seconds of air time video!
A bit of a rough landing and the plane was back on the ground without any real damage. I did notice that the trailing edge of the wing with the tape had torn the edge a little, but not enough to worry about. I was too eager to view the video to think too much about it anyway. I unstrapped the cell phone and pushed the side button to reactivate the screen. It was not still taking video! I opened the list of videos and found the one it had taken. For some reason it was only 43 seconds long! Barely enough time to get the plane into the air let alone into the clouds. Now I bummed. I thought maybe I had made some sort of mistake in setting things up so I decided to try taking a sample video. Sure enough, it stopped at 43 seconds again! What's up with that? I know that early cell cameras could only take short duration videos and thought this one might have a similar limitation based on resolution, memory, etc.
Well, I thought I would try one more time and see what I could get in 43 seconds. I cut another piece of tape and got the phone ready to go, started the video recorder and strapped it on. A quick check of the controls and tossed it into the air! It flew great and for another 5 minutes or so. No sense in cutting the flight short just to check the video and so I went back up into the clouds and enjoyed the flying.
I thought I would be able to make a better landing, especially since I had made two great practice passes. This would not be the case as I made a typical knee jerk response a foot off of the ground and cart wheeled the plane. There was no real damage to the plane as it was going slow and was so close to the ground, but the force did pull the strapping tape further into the trailing edge of the wing. So, no more flying today.
I pulled of the cell phone and checked the video. I knew that I was only going to get 43 seconds, but I had hoped to get more air time. Well, even though I thought I had rushed and gotten into the air faster than the first time, I had actually done worse and did not get any air time at all. So much for my first time out trying to get video.
The good news is that I really liked how the plane flew with the new power train. Even though I can't go vertical, I still like the gain in power and I got significant flying time off of the new LiPO pack. I do have a three blade prop that I might check the next time out. We'll see if that makes any difference.
I guess next time along with the fixes needed from this time, I'll include some actual details on the motor, speed controller, and LiPO pack I added.
Thanks for stopping by my blog and please post comments, good or bad. Be sure to come back and check for future posts.
OK, the wings are fixed and ready for flight testing. As I prep all my stuff for the next available flight time, I see that there is another issue that should be resolved and cleaned up. Until now, I've been using a stack of washers as a nose weight to balance the CG (Center of Gravity or balance point) of this plane. The Wild Hawk is notoriously tail heavy and needs much attention to get the CG much forward of the center of the wing. After much research I have come to the conclusion that the CG point should be between 2 to 2.5 inches from the leading edge of the wing. After moving my battery as far forward as I can without cutting more than the battery retaining foam, I still needed the weight of three 1/2" washers to balance out at about 2.25 inches. This was OK, but they were just stuffed into the compartment with the battery and could come out in a crash. Also, if I used a different battery (LiPO) they did not fit in as snug and were usually not enough weight.
Just about 2.25 inches
New position for the battery to improve CG.
(This is an old photo)
So I decided to take the opportunity to make a change. I had seen someone on the Internet use a fishing "egg" sinker to balance their Wild Hawk, and out to the garage I went to find my tackle box. I came back in with a few old drop style sinkers that my late Grandfather had made way back in the day, and some newer smaller pinch style shot weights. The drop style I estimated at being 1/2 and 1/4 ounce while the shot were probably about 1/8 ounce each. Now the Wild Hawk that I had seen with the egg style sinker just had a hole drilled into it and the sinker hot glued in. I did not want to do this and I also wanted to be able to change the amount of weight installed so I could add more when using a lighter battery. I accomplished this by slicing a wedge of foam out of the top of the nose and then boring some holes down into the foam to make room for the sinkers. I used my modified soldering iron to create the holes with the idea that the melted foam would actually provide for some stability in the nose and hold the weights better.
Holes bored in with solder iron
With the NiMH weights
After some experimenting I was able to balance my Wild Hawk at the point I wanted, 2.25 inched from the leading edge. This was with the original NiMH battery and the two drop sinkers and four shot weights. I made the holes for the shot weights deep enough so that I could add more later. I found the "more" amount to be 5 of the shot weights to give me the same CG balance point. I hot glued in the first set of weights and made sure there was room for the "more" weights. To hold everything in I just used some fiber strapping tape and taped from the nose over the top of the piece that I cut out. This worked out just fine in practice.
With the "more" weights
Now for the test. I finally got some flight time and the plane flew great with the original NiMH battery and I had no issues! The wings held up great too and showed no signs of bowing even pulling through a loop! After flying until the NiMH battery was dead, I switched to my LiPO battery. I opened the front hatch by pulling back the strapping tape and dropping in the extra shot weights. Then I closed the hatch by sticking the tape down again. I flew this one till dead also. Even with a few crashes I had no issues with the nose weights! I am very pleased with these two new mods!
For some added fun, here are two vids of my Dad flying. First he's flying my brothers Wild Hawk and then his own Wild Hawk (O'l Hickory).
Thanks for stopping by my blog and please post comments, good or bad. Be sure to come back and check for future posts.
After complaining about too much wind and not being able to fly, I was now waiting for a chance to fly with wind. Yeah, I wanted to test if it would make much of a difference flying in the wind with ailerons. So, finally a chance to fly and a day with wind. About 8 to 10 mph.
I started with a full charge on the stock NiMH battery and tossed the aileron equipped Wild Hawk into the wind. Wow, it flew great! The ailerons really made a difference if keeping the plane in the air. I continued to fly and enjoy playing in the wind. I did notice that one drawback to flying in the wind is that you can only fly into the wind if you have the battery to do it. I had to bring the plane in long before I normally would have while I still had enough power to bring it in.
So my flying in the wind was a success and I had a great time. I was so eager to fly again that I went our as soon as I could. I was having a great time and even decided to try a few loops. Good thing I only tried one though because as soon as it pulled full Gs, I noticed that the wings had an odd angle to them. I put the plane through a few more maneuvers and noticed the same odd wing angle. Oops, time to bring it in!
Servo label nicely glued into the cutout!
Well, I brought the plane in a little too aggressive in an attempt to keep the wings in one piece and lost an aileron servo. No big deal, and it will teach me not to hot glue servos in on the side with a sticker. The bond is only as good as the sticker glue!
Wing crease right about where the window divider in the back groung meets the wing
Ok, so upon inspection, I found that the wings were both starting to kink and flex right at the line where the wing spar ends and the aileron servo cutout and aileron cutout weakened the wing. Another learning experience, watch out where you make alterations and where the stress points are!
Now I need to figure out how I'm going to strengthen my wings so they don't crack and give out during a flight. That will be my next blog.
Thanks for stopping by my blog and please post comments, good or bad. Be sure to come back and check for future posts.
Well, I finally got a chance to fly again. It was still a little windy but I wanted to fly anyway.
The new hinges on the tail worked great! I love these new hinges!
OK, that might all be fine, but the wind took control on a low turn and I hit full power nose down into the ground. Broke the nose off of the plane, again.
Can't really see the full extent of the damage but you can see it's seriously tweaked. This is also after I spent a good half hour taking all of the tape off. You have to tape these really good, especially while learning.
Now you can see some of the damage.
I had to completely disconnect the nose to realy fix it right, so I did.
All nicely glued back together!
Well, I took the opportunity to do some updates while I was at it. I decided to do some spoon scoops to try to improve cooling.
This is the nose hole I started with. This is up front by the battery.
The spoon cut real easy with an Exacto saw blade.
I marked the location with a pen so I would know where to place a bead of hot glue
This seemed like the best place for the exhaust port.
You can see them both installed in this view. Not real easy to see, but they are there.
Thanks for stopping by my blog and please post comments, good or bad. Be sure to come back and check for future posts.
Ok, no sooner did I buy the CA glue and the thin hinges, and I saw a video about making tape hinges. This was the best hinge advice ever! The idea is that you take strips of tape about an inch long. These are joined together by overlapping them about 1/4 of an inch sticky side to sticky side. These are then run from one side of one surface to the other side of the other surface. Oh heck, this will make much more sense if you just watch the video. The part you'll want is about 5 minutes in.
So, here is my progress on installing this type of hinge.
This hinging system is awesome! They move so freely and have so much more movement. I no longer have any issues with the tail spar yawing when the servos move full lock.
Well I'm still waiting for he weather to behave and allow for some nice flying. So far any time I've been able to get out, the wind has been 10mph and higher. We'll see.
Thanks for stopping by my blog and please post comments, good or bad. Be sure to come back and check for future posts.
Wait, there was some new stuff to post today. Well sorta.
I was able to hook my laptop with FMS to my big screen TV (38")! That was a lot of fun and a lot better than the puny 15" display.
Well, it didn't photograph very well, but you get the idea. I think I was flying around the island scenery selection.
So much for the FMS update.
There is some construction going on at my work and I noticed that they are using the blue Styrofoam insulation.
I hear this is great stuff to use to repair foam planes so I hunted around and found a scrap piece.
Now I'm not exactly hoping to use it, but if I need it, I have it.
More to come. I still need to attach my rudder and elevator to the tail of my plane and resolve the issue of my rudder moving more to one side than the other. So keep posted.
Thanks for stopping by my blog and please post comments, good or bad. Be sure to come back and check for future posts.
I finally received the parts I ordered to complete my LiPo battery packs. What I received are the power leads with Tamaya (I thinks that's the right spelling) connectors and the charging leads with connector for a three cell series pack. I also picked up an inexpensive balancing charger and a really cool little device that will show the voltage state of each cell as well as the whole pack.
This is a picture of the pack after all the wires were soldered. It's essentially ready to go with the exception of protecting it with tape or heat shrink.
This photo shows the pack connected to the pack reader. It is currently showing the voltage of the whole pack.
This little pack reader is cool. It will cycle through each cell and show it's voltage. Once through the whole pack it will show the pack voltage.
This picture shows the pack connected to the charger. The red light shows that it is charging. It will turn green when complete.
One item that I wish I had left on my order was a pack balancer. This little device plugs into a pack and will bring all the cells in a pack to the least safe level. This is done so that they are all in the same state and "balanced". I know the charger will do this but I could have one pack on the charger and another on the balancer.
I found one big issue when I went to connect the pack to my plane. The power connection was wired wrong! Good thing I was looking and did not plug it in and hit the power switch. I'm sure I would have let out all of the magic smoke from everything!
It was a simple, but tedious, matter of reversing the leads in the connector and I was set for a test.
Wow! What a difference in power! And I should get almost double the run time (1300mah to 2200mah).
Thanks for stopping by my blog and please post comments, good or bad. Be sure to come back and check for future posts.
So I know that there were some issues with the tail of my plane because, as I noted before, I noticed the tail of my plane torquing over when moving the control surfaces. I finally had a chance to take a look at it and found some causes and more issues.
You can see from this picture the bush rod is bumping out the side. This was due to the rudder not moving as freely as it should to one side. After I fix the cause (see below) I will use some clear packing tape to secure it down and add rigidity to the tail spare. I will do both sides for symmetry.
In this picture you can see that the push rod is touching the foam slot and really binds when the arm is moved to the left and right.
This is the right side (rudder) and it is doing the same as you can see.
Here is the culprit of the rudder push rod bowing out. The rudder is hitting up against elevator.
In this photo it looks like everything is where it is supposed to be and that the issue is with the elevator surface connector. I have decided that I will remove the surfaces and redo them with more space in between and give the rudder more room to make those left turns.
You can see the knot I put in the antenna wire. This keeps it from pulling inside when I pull out the receiver.
I also found that the foam hinges, while helping it go together fast, are very stiff and make it slower to respond and you don't get as much movement.
When I put them back together, I still have not decided if I will use tape hinges (fast, easy, but not as robust) or thin plastic film hinges (much more difficult to align and glue in, but more sturdy).
As usual, more to come.
Thanks for stopping by my blog and please post comments, good or bad. Be sure to come back and check for future posts.